631-609-3637 Live Chat


File Preparation Guide
Following hints will help you in preparation of your artwork/file(s) for trouble-free conversion to Press-Ready status.
Image Resolution
- 1. Images you include in your file should be minimum 300 DPI (dot per inch) at the final size. Images that contain text should be minimum 400 DPI at the final size. Images less than 300 DPI are called low quality images and do not print well. If we receive your artwork/files that contain images less than 300 DPI, we will inform you via an email or a phone message.
- 2. Do not Enlarge a low resolution images to satisfy your size requirement. A 300 DPI 1” x 1” image will become a150 DPI image if you enlarge it to 2” x 2” and will print fuzzy and lack details.
- 3. Do not Upsample or Upscale a low resolution image by saving to high resolution without a change in dimension. This will certainly result into a bad image with concentration of colors in certain areas and also blur it.
- 4. Do not use images from the web pages. Web images are generally 72-96 DPI resolution which is very low resolution and is mainly intended for internet use. These images will not print good in full color process printing.
- 5. Image resolution and image size are inversely proportional i.e. as image size decreases, resolution increases. Therefore the only remedy to a low resolution image is to reduce its size to a level where you get minimum 300 DPI resolution, or to recapture the image with the capturing device solution set to 300 DPI or higher.
- 6. Unfortunately our technicians cannot help you in resolving issues arising due to low resolution image(s). Please follow the remedies listed in paragraph 4. Also check our Free Proof and Fix My File service page to see what our technicians can do for you for FREE.

Not Acceptable
Image Resolution: 72 DPIPAcceptable
Image Resolution: 300 DPI
RGB to CMYK Conversion
RGB (Red, Green and Blue) colors are used to display images on computer displays. Printing process uses 4-colors called CMYK to print color images. CMYK stands for pigment Cyan (blue), Magenta (red), Yellow and Black.
Before sending your Artwork, you should convert it from RGB to CMYK colors. This will ensure that we get your graphics in the colors you want. It is best if you use a graphics software that provides you the option of working in RGB or CMYK modes ans allows conversion. This way, once your artwork is ready, you can convert it into CMYK colors. We suggest that you create your graphics in CMYK mode so you can see how it will look on the printed paper. If we receive your artwork/file/images in RGB colors, we do a conversion to CMYK, the results of which may be different that what you expect. We, at PrintingFairy therefore, always send you an Electronic Proof or Press Ready file so you can review all aspects of your printing project before it goes to press.
Please visit http//:www.pantone.com to purchase Pantone Color Guides that provides RGB to CMYK conversion values for the complete set of process colors.
Remember images that look fine on your monitor will not be automatically transferred to high quality 4-color images on paper during the color printing process. There will always be some variance between RGB to CMYK conversion. Following illustration will show you what you will see in RGB to CMYK conversion.
 |
 |
|
|
This what you see in RGB color Mode |
This what you see after CMYK conversion on paper |
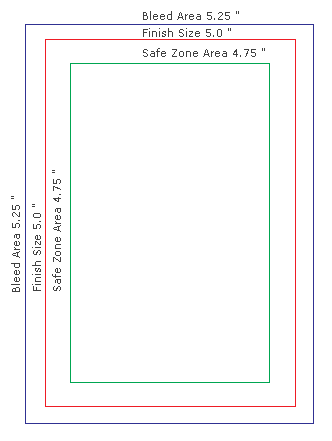
Bleeds, Guides, Borders & Safe Area
Bleeds, sometimes also called full bleeds, refers to a printing that goes all the way to the edges of your printed document. If you want bleeds or full bleeds printing, you should add 0.125” on all sides of your document. Adding bleeds to a document that is 5” x 8” at final size will make it 5.25” x 8.25” size document. Therefore, for bleeds printing, your images and artwork should be sized for 5.25” x 8.25” document.
We at PrintingFairy do not charge you extra for bleeds or full bleeds. It is an option at no extra cost. Just include bleeds in your artwork.
Guides or crops are marks on all corners of your document to show where to cut or trim for final size. Do not draw actual lines to show us the final trim lines for your finished size. Instead use only guides or crops on corners to show the final trim lines.
If your printed piece has borders, this should be at least 1/4” thick. Less than 1/4” border width may result into uneven cut line during the trimming process due to mechanical tolerance of the cutting edge.
Safe Area sometimes also called Safety Zone is area 1/8” inside the trim line on each side of your printed document. You should keeps your images and words within this area (unless you have bleeds) to avoid being trimmed.
Safe Area sometimes also called Safety Zone is area 1/8” inside the trim line on each side of your printed document. You should keeps your images and words within this area (unless you have bleeds) to avoid being trimmed.
Fonts Conversion to Outlines
All texts in your artwork and specially if you are using vector formats for your images, you must covert your fonts, transparencies and effects to outlines and save your files before sending your artwork. This will ensure that fonts are copied to proof (for your review) exactly you intend them to be printed.
If your artwork and files are missing fonts, we will inform you about his via an email or a phone message. You may send us the fonts or upload again your artwork/files after including the desired fonts.
Accepted File Formats
PrintingFairy accepts the following file formats for artwork files:
- PDF - Adobe Acrobat (Recommended)
- AI - Adobe Illustrator
- PSD - Photoshop
- CDR & CLK − CorelDraw
- EPS
- GIF Image
- JPEG Image
- PPT & PPTX - Microsoft Power Point
- PUB − Microsoft Publisher
- DOC & DOCX - Microsoft Word
- PNG Image
- PS − Postscript
- EMF - Windows Enhanced Metafile
- WMF − Windows Metafile
Vector Art
Vector images and artwork retain their high quality at any size due to the way they are created. Vector images are composed of mathematical equations to identify each area of the image.
We suggest when possible, you should use vector images in your artwork to maintain high quality of your artwork.
Fold Marks
Make sure that your indicates the fold marks or lines where you want folding in your documents such as brochures, folders and envelopes.
Hole Drill Location(s)
If your printed document will have hole drill(s), please indicate hole drill location(s) in your artwork.